
I absolutely love baking during the spooky season, and this Witches Fingers Cookies Recipe has quickly become one of my all-time favorites to make and share. There’s just something so delightfully eerie yet delicious about these creepy, almond-tipped treats that makes them perfect for Halloween or any fun gathering. From their buttery, tender texture to the playful “knuckles” and “nails” dappled with red gel frosting, these cookies never fail to put a smile on my face and a little chill down my spine. I can’t wait to walk you through exactly how to make these charmingly spooky cookies!
Why You’ll Love This Witches Fingers Cookies Recipe
I adore this Witches Fingers Cookies Recipe because it strikes the perfect balance between spooky and scrumptious. The flavor is buttery and subtly sweet with just a hint of almond that adds a lovely depth. Each cookie has a tender crumb that melts in your mouth but still has enough firmness to hold its creepy finger shape, especially with those knuckle details and almond nails.
What I really appreciate is how approachable this recipe is. Despite the intricate-looking appearance of the fingers, the dough is straightforward to handle and comes together quickly. The chilling steps help keep them from spreading too much, so the fingers keep their form beautifully. It’s ideal for Halloween parties, classroom treats, or even just a playful dessert for family dinners—you’ll find yourself making them year after year!
Ingredients You’ll Need
All the ingredients for this recipe are pantry staples and work harmoniously to create a visually striking yet deliciously classic cookie. Each item plays a vital role in flavor, texture, or that eerie presentation that makes these Witches Fingers truly unique.
- Butter (1 cup, room temperature): Provides rich flavor and contributes to the tender texture of the cookies.
- Powdered sugar (1 cup): Ensures a smooth, melt-in-your-mouth sweetness without any grittiness.
- Egg (1): Acts as a binder to bring the dough together and give structure.
- Vanilla extract (1 teaspoon): Adds warmth and rounds out the sweetness perfectly.
- Almond extract (1 teaspoon): Gives a subtle nutty note that enhances the “witchy” vibe.
- Flour (2 ¾ cups): The building block that shapes the dough and creates the sturdy finger form.
- Baking powder (1 teaspoon): Helps the cookies rise slightly for a tender crumb.
- Salt (½ teaspoon): Balances the sweetness and enhances all the flavors.
- Red gel frosting or red jam/jelly: Creates the spooky blood-like effect on the “nailbeds.”
- Whole blanched almonds or sliced almonds (60): Serve as the creepy “fingernails” that make these cookies stand out.
Directions
Step 1: Using a handheld mixer, cream together the butter and powdered sugar until fluffy and light in color. Then beat in the egg, vanilla, and almond extract until everything is well combined and smooth.
Step 2: In a separate bowl, whisk together the flour, baking powder, and salt. Gradually add this dry mixture into the butter mixture, mixing just until a soft dough forms. Be careful not to overmix to keep the cookies tender.
Step 3: Wrap the dough in plastic wrap and pat it into a disk shape. Refrigerate for at least 30 minutes. Chilling is essential because it helps keep the dough firm for shaping and prevents spreading while baking.
Step 4: Preheat your oven to 325°F (165°C) and line baking sheets with parchment paper to prevent sticking and allow even baking.
Step 5: Take the chilled dough and scoop out portions, rolling each into 1-inch diameter balls. Then gently roll each ball into approximately 3-inch long finger shapes. Arrange them on the prepared baking sheets, spaced about 2 inches apart to give them room to bake properly.
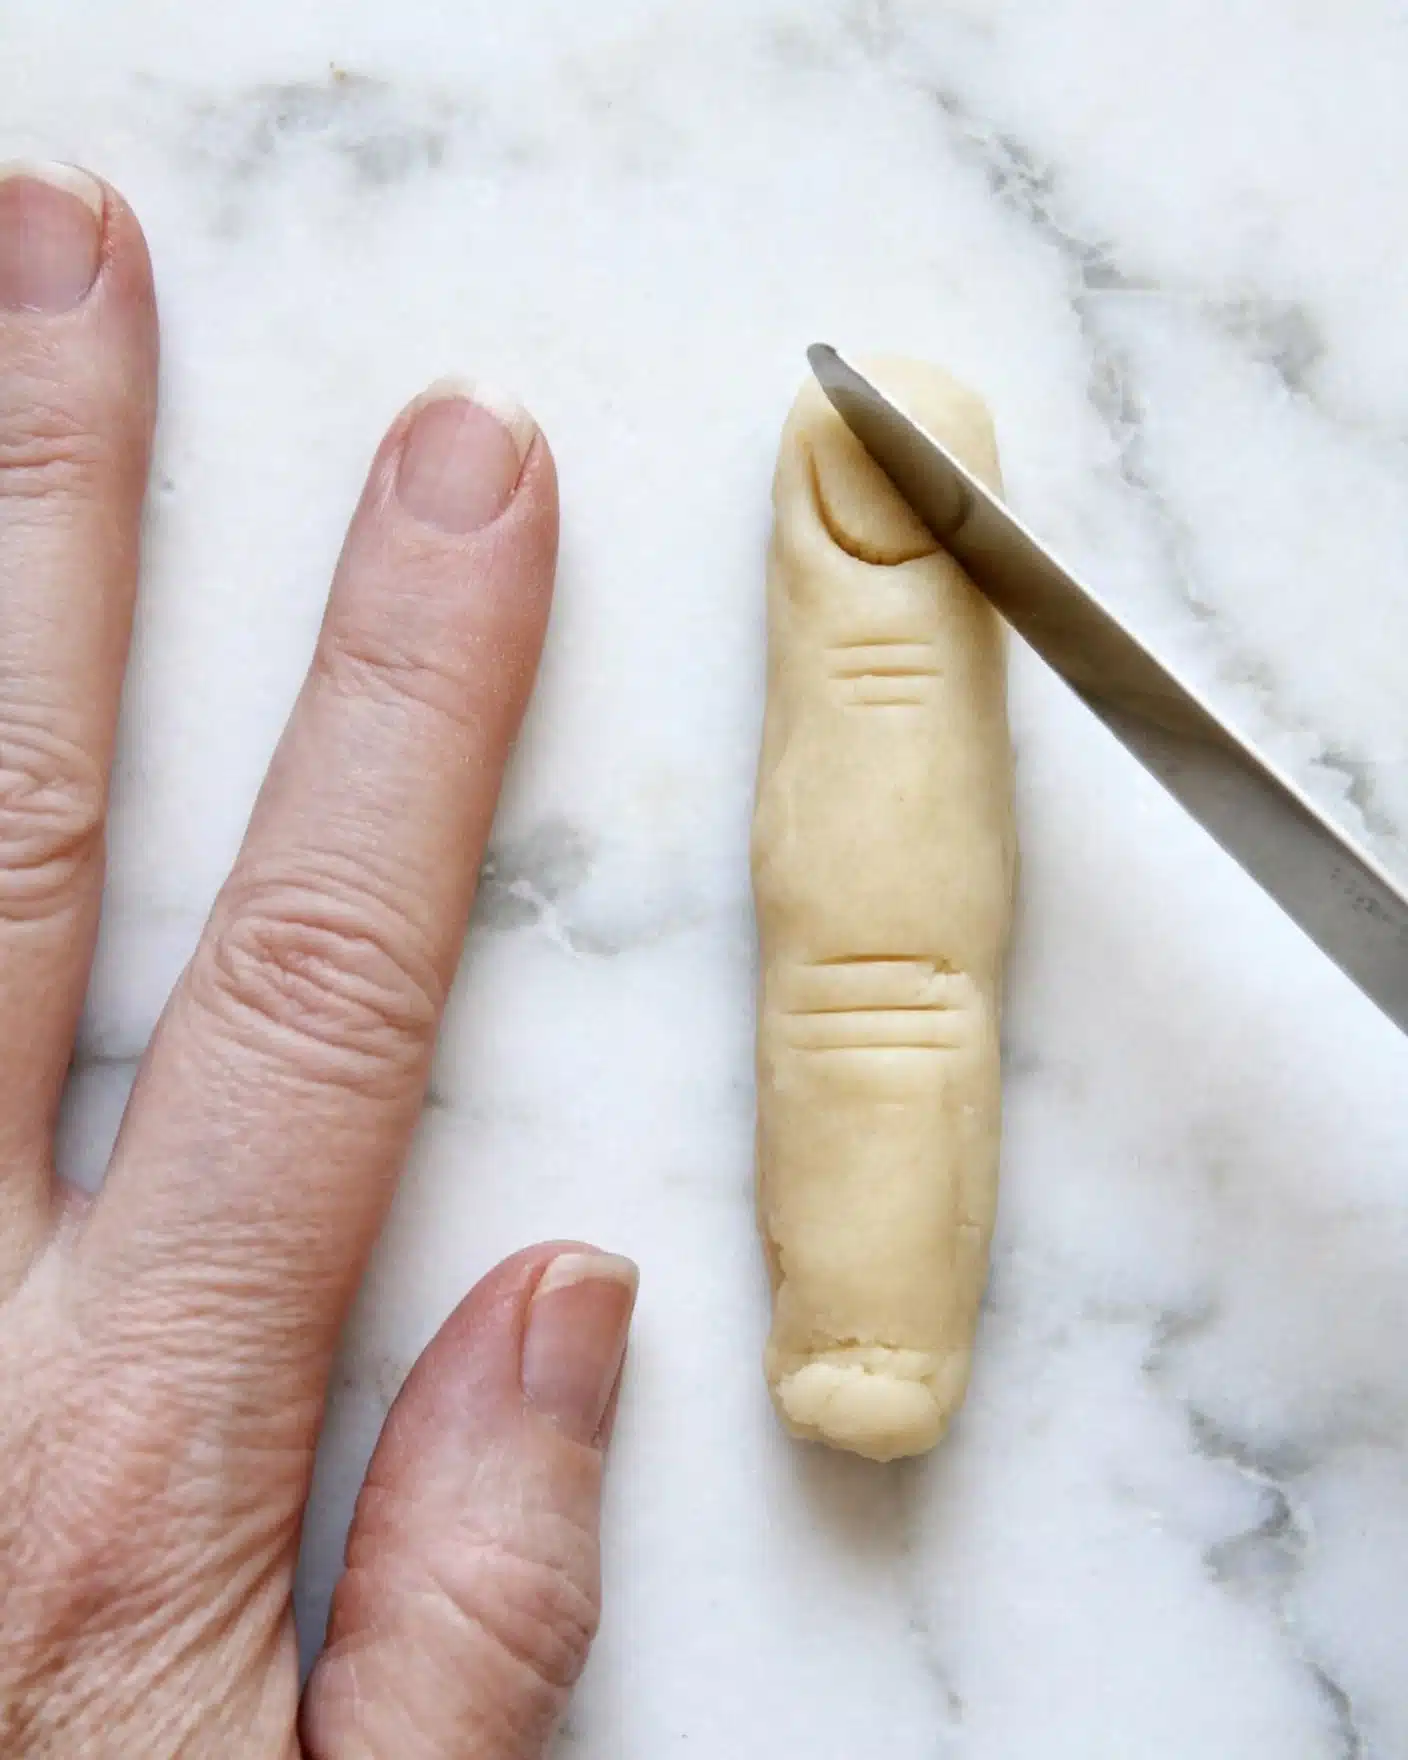
Step 6: Using the dull side of a knife, carefully make three shallow parallel marks around the middle of each finger to mimic knuckles. Pinch the dough gently above and below these marks to accentuate the finger shape. Finally, press your index finger slightly at the top of each cookie to create a nailbed indentation.
Step 7: Place the baking sheets in the freezer for a few minutes until the dough firms up again—this helps maintain the finger shape during baking.
Step 8: Bake the fingers in the preheated oven for about 15 minutes or until they turn a light golden color around the edges. Keep an eye on them to ensure they don’t over-brown.
Step 9: Remove the cookies from the oven and let them cool on the baking sheets for a few minutes. While still warm, carefully apply a small dab of red gel frosting or jam to each nailbed, then press an almond on top to resemble a fingernail. Let the cookies cool completely so the almonds stick securely.
Servings and Timing
This Witches Fingers Cookies Recipe yields about 5 dozen spooky fingers, making it perfect for large gatherings or sharing with friends and family. The prep time is around 20 minutes, with an additional 30 minutes of chilling time plus 15 minutes of baking. Altogether, you’re looking at roughly 35 to 40 minutes total from start to finish if you include the chilling period. Cooling time is also important but happens mostly hands-off, so you can prep other treats or decorations while you wait.
How to Serve This Witches Fingers Cookies Recipe

I love serving these cookies with a bit of theatrical flair, especially during Halloween parties or themed movie nights. They pair beautifully with a glass of cold milk or a warm spiced cider to balance the sweetness and enhance the cozy vibe. For adult gatherings, I find a dry red wine or a fun pumpkin-spiced cocktail to be surprisingly complementary.
Presentation-wise, arranging the cookies on a rustic wooden platter littered with “spider webs” made from spun sugar or cotton candy really amps up the creepy factor. Garnishing with a few plastic spiders or dry ice for a smoky effect makes dessert time feel like a spellbinding experience. These cookies are best served at room temperature so the almond “nails” stay firm and the dough remains tender but not too soft.
For portion control, I suggest letting guests indulge in two or three fingers at a time—enough to satisfy the sweet tooth and keep the spooky fun going. They also make adorable party favors packed in clear bags tied with black and orange ribbons. The combination of taste, texture, and theatrical presentation makes these cookies a standout treat at any event.
Variations
One of the fun parts of this Witches Fingers Cookies Recipe is how easily it can be customized to suit different tastes or dietary needs. For example, if you want to go gluten-free, swapping regular flour for a gluten-free all-purpose blend works beautifully—just be sure it contains xanthan gum for structure. To make it vegan, I recommend using vegan butter and a flax egg substitute; the texture will be just as rich and tender.
If you’re feeling adventurous, you can switch up the extracts to create unique flavor profiles. Using peppermint or orange extract instead of almond adds a festive twist, and you could even tint the dough with green or purple food coloring to make the fingers look extra eerie. For a softer texture, try baking at a slightly lower temperature for a longer time to get that melt-in-your-mouth feel.
Another variation I enjoy is drizzling melted dark chocolate over the cooled fingers to give them an extra dimension of flavor and a glossy, wicked finish. Or if you prefer a fruitier flavor, swapping red frosting for raspberry jam adds a fresh tang and makes the “blood” look more realistic.
Storage and Reheating
Storing Leftovers
If you have any Witches Fingers Cookies left over (which is rare in my house!), store them in an airtight container at room temperature. They stay fresh for up to 5 days, maintaining their tender texture and distinctive almond nails. I like to layer the cookies between sheets of parchment paper to prevent sticking and protect their delicate shapes.
Freezing
You can absolutely freeze these cookies if you want to prepare them in advance. I recommend freezing them unbaked by shaping the dough fingers on parchment-lined trays and flash freezing for a couple of hours. Then transfer them to a freezer-safe container or bag for up to 3 months. When ready, bake straight from frozen, adding a couple of extra minutes to the baking time. Alternatively, you can freeze fully baked and decorated cookies, carefully separating layers with parchment paper, though the almond nails may be a bit fragile after thawing.
Reheating
To bring the cookies back to life after storing or freezing, gently warm them in a low oven at 300°F (150°C) for about 5 minutes. This helps refresh the buttery aroma and softens the texture slightly without melting the frosting or almonds. Avoid microwaving, as it can make the cookies overly soft or cause the almond nails to loosen. Serve immediately for best taste and presentation.
FAQs
Can I use regular sugar instead of powdered sugar for this recipe?
Powdered sugar is important here because it dissolves smoothly into the butter, creating a tender and fine crumb in the cookies. Using granulated sugar will result in a grittier texture and less delicate dough, so I don’t recommend substituting it.
What if I don’t have red gel frosting—can I use something else?
Definitely! If red gel frosting isn’t available, you can use red jam or jelly like raspberry or strawberry to mimic the “blood” on the nailbeds. Just make sure it’s thick enough so it doesn’t run too much. Alternatively, a small amount of red food coloring mixed with corn syrup also works well.
How do I prevent the cookies from spreading too much while baking?
The key is chilling the dough thoroughly before shaping and baking. The cold dough holds its form better, so the fingers keep their knuckle and nail details. I also pop the shaped cookies in the freezer briefly before baking for added firmness, which really helps.
Can I make these cookies ahead of time for a party?
Absolutely! These cookies keep well for several days at room temperature and can be made fully a day in advance. You can even freeze baked cookies and reheat them gently before serving. This makes them a really convenient option for holiday entertaining.
Why do the cookies sometimes turn out crumbly, and how can I fix that?
If your dough feels crumbly, it usually means there’s not enough moisture or fat. You can add a tiny bit of milk, just a drop at a time, to bring the texture together. Be careful not to add too much liquid, or the dough will spread too much while baking.
Conclusion
I can’t recommend this Witches Fingers Cookies Recipe enough for anyone looking to add a bit of spooky fun and delicious flavor to their baking repertoire. Whether you’re making them for Halloween or just because you love quirky treats, these cookies are a guaranteed hit that impress with both taste and appearance. I hope you enjoy making and sharing them as much as I do—they’re truly a bewitching delight!
PrintWitches Fingers Cookies Recipe

Witches Fingers Cookies are spooky Halloween treats shaped like creepy fingers with almond fingernails and red gel ‘blood’ frosting. These buttery, soft, and detailed cookies are perfect for festive parties or to delight kids with a fun and eerie twist on classic sugar cookies.
- Prep Time: 20 minutes
- Cook Time: 15 minutes
- Total Time: 35 minutes
- Yield: 5 dozen (60 cookies)
- Category: Dessert
- Method: Baking
- Cuisine: American
Ingredients
Cookie Dough
- 1 cup butter, at room temperature
- 1 cup powdered sugar
- 1 egg
- 1 teaspoon vanilla extract
- 1 teaspoon almond extract
- 2 ¾ cups all-purpose flour
- 1 teaspoon baking powder
- ½ teaspoon salt
Decorations
- Red gel frosting or red jam or jelly (for nail beds)
- 60 whole blanched almonds or sliced almonds (one for each cookie)
Instructions
- Cream Butter and Sugar: Using a handheld mixer, in a large bowl, cream together the butter and powdered sugar until light and fluffy. Beat in the egg, vanilla extract, and almond extract to combine well.
- Mix Dry Ingredients: In another bowl, whisk together the all-purpose flour, baking powder, and salt thoroughly. Gradually add the dry ingredients to the butter mixture, mixing slowly to form a soft dough.
- Chill the Dough: Wrap the dough in plastic wrap and pat it into a disk shape. Chill it in the refrigerator for at least 30 minutes to firm up and prevent spreading during baking.
- Prepare Baking Sheet & Oven: Line baking sheets with parchment paper. Preheat the oven to 325°F (165°C).
- Shape the Fingers: Scoop out portions of dough and roll each into 1-inch diameter balls. Then shape each ball into a 3-inch long finger shape. Arrange the fingers about 2 inches apart on the prepared baking sheets.
- Detail the Fingers: Use the dull side of a knife to make 3 parallel marks midway down each finger to mimic knuckles. Pinch the dough above and below each knuckle to add dimension. Press down lightly with your index finger near the top to create a nailbed indentation.
- Chill Before Baking: Place the baking sheet with shaped fingers in the freezer for a few minutes to firm them up while preparing additional fingers on the next sheet.
- Bake: Bake the chilled fingers in the preheated oven for about 15 minutes or until golden around the edges.
- Decorate: Remove the cookies from the oven and let them cool slightly. Squeeze a bit of red gel frosting or jam onto the nailbed and press an almond on top to form the fingernail. Let cool completely so the almond adheres firmly.
Notes
- Chilling the dough helps reduce cookie spreading for better finger shapes.
- If the dough is too crumbly to roll, add milk drop by drop until it reaches a workable consistency.
- Use red gel frosting for the best bright ‘bloody’ effect; jam or jelly can be a substitute.
- Make sure to press fingernail indentations deeply so the almond and frosting adhere well.


